| | Who is responsible? | Process of plugging a well | Steps to plugging a well | Special problems |
When a well is no longer being used or maintained for future use, it is considered abandoned. Abandoned wells pose a serious threat to the preservation of groundwater quality. They are also a serious safety hazard for children and animals. There are approximately 59,000 farmsteads in Alberta and most of these have at least one well. In addition there are a great number of non-farming rural residents that rely on water wells. The exact number of abandoned wells in Alberta is unknown but is estimated to be in the tens of thousands. Plugging an abandoned well prevents:
- Downward movement of water in the well or well annulus
- Surface contamination from reaching aquifers
- Intermixing of water between aquifers of different water quality
- Serious accidents from happening.
Unfortunately, groundwater contamination and its effects are usually not recognized until groundwater quality is seriously affected and nearby wells have been contaminated. Surface contaminants can enter a well several ways:
- Directly through the surface opening if the cap is loose, cracked or missing
- Through unsealed spaces along the outside of the casing (see Figure 1, Well Contamination).
When the steel casing of an abandoned well starts to corrode, holes will develop. When this takes place, surface contaminants or poor quality water from shallow aquifers may migrate into the deeper aquifers of nearby operating wells (see Figure 2, Contamination From an Abandoned Well).
.
| Wells that are no longer being used should be plugged. They are a serious public safety and environmental hazard. |
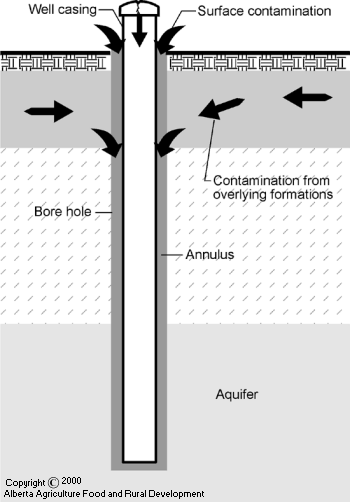
Figure 1 Well Contamination
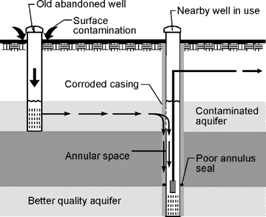
Figure 2 Contamination From an Abandoned Well
Who is Responsible?
In Alberta, responsibility for plugging a water well is defined by legislation. The well owner is responsible for plugging the well When:
- The well is no longer being used as a water supply
- The well is in a poor state of repair and the pumping equipment has been removed or cannot be repaired or replaced
- The well produces water that is unsuitable for drinking.
The licensed water well contractor is legally responsible for immediately plugging a well when it is not completed due to construction problems or inadequate yield. Before you sign a contract with a driller, ask questions about what materials are going to be used to plug the well and associated costs. It is generally best to hire a licensed water well contractor to complete the plugging of your well. This person has the expertise and equipment to do a proper job. Unless you use the right plugging materials and have them properly placed in the well, you will end up with a poorly sealed well that will continue to allow contaminants to enter into the groundwater. When a replacement well is drilled, your old well should be immediately plugged.
Process of Plugging a Well
There are several steps to take before actually plugging the well. Some steps you will be able to do yourself and others you may want to consult with, or hire, a licensed water well contractor to complete.
Preparation
To know exactly how much plugging material is needed, measure the total depth and diameter of the well, plus the non-pumping water level (the depth to the standing water in the well). If possible, compare these measurements to the information on the drilling report from when the well was originally constructed. The only time you should even consider plugging a well yourself is when the well is open to its original depth.
| For information on how to take a non-pumping water level measurement, see Module 5 "Monitoring Your Water Well". |
Ideally the casing should be removed from the well before the plugging process begins. Often only the liner casing is removed and the surface casing is left intact because it is more difficult to remove and it could separate down hole. The older the well, the more difficult it will be to successfully remove the casing. If the casing is left in place, it should be perforated, particularly if there is evidence of water movement in the annulus of the well. Any casing left
in place must be cut off 0.5 m (20 in.) below ground surface after the well is plugged.
Materials
Materials that are used to plug a well must be uncontaminated and impervious. They must prevent any movement of water. See the chart below for acceptable and unacceptable materials.
Acceptable Materials | Unacceptable Materials |
- grout
- neat cement (cement mixed with water)
- sand cement (cement, sand and water)
| sand |
- concrete (cement, sand and aggregate mixed with water)
| gravel |
- manufactured high yield bentonite products
| drilling mud or fluid |
- clean, uncontaminated clay (for large diameter wells)
|  |
.
High yield bentonite is a special type of clay that swells when wet to provide a very effective impervious seal. It comes in a powder that when mixed with water produces a slurry that can be pumped into the well. It is also manufactured in pellet or granular form that is designed to pour into the well. This type of bentonite when mixed with water will actually swell to about eight times its original size and will form a water-tight plug. It is important to understand that bentonite cannot be used as a plugging material in some situations. When the chloride level in the well water is greater than 4000 mg/L, or the calcium level is greater than 700 mg/L, bentonite will not swell properly, so then it is best to use a cement grout.
Large diameter or bored wells pose special problems because of their size and the volume of material required to fill them. A lower cost alternative for the plugging material is clean, uncontaminated clay that can be shovelled into the well until it is filled. This must be done carefully, however, to ensure the clay reaches the bottom of the well and seals off all empty space. The cribbing must be cut off below ground surface and the well should be topped up with high yield bentonite to make a water-tight seal. Cement grout and concrete may shrink after setting so may not create as good a seal as bentonite.
| Cement grout and concrete may shrink after setting so may not create as good a seal as bentonite. Sand and gravel are not acceptable materials. They are not impervious materials because water can easily move through them. |
Method
Aside from choosing the appropriate plugging material, the method of placing material into the well is most critical. Regulation requires that the plugging material must be introduced from the bottom of the well and placed progressively upward to ground surface.
If the plugging material is cement grout, concrete or bentonite slurry, special equipment is needed. The material must be placed into the well through a tremie pipe that is usually about 3 in. in diameter. At all times this pipe must be kept below the surface of the plugging material to prevent it from diluting or separating. It is recommended that you hire a licensed water well contractor when a slurry is chosen as the plugging material because they will have the proper equipment and experience to do the job correctly.
When bentonite pellets are chosen for the plugging material, they can be poured into the well from the ground surface. These pellets have a weight material added to help them sink to the bottom of the hole. They are also coated to prevent immediate swelling on contact with water. When poured slowly, they should reach the bottom of the well before swelling. If you are not careful, however, these pellets will bridge off down hole and the well will be only partially plugged (see Figure 3, Bridging).
Before you pour in the pellets, you can determine how many feet of well casing can be filled with the size of pellets you have chosen. As the well is being filled, measure the depth to the top of the plugging material quite frequently. Then you will know if the plug is rising faster than expected indicating a bridge has formed. If this happens, be sure to break it up before adding more material to the well.
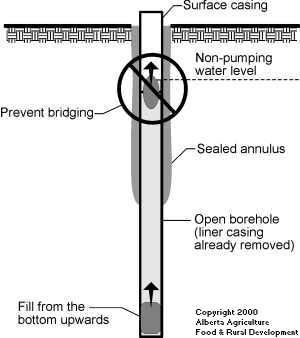
Figure 3 Bridging
Steps to Plugging a Well
Step 1
Remove all pumping equipment from the well. Thoroughly flush out the well using a bailer or air compressor.
Step 2
Measure the total depth of the well, the diameter and the non-pumping water level. If possible, compare these figures with the information on the original drilling report. Confirm whether the well is open to its original depth.
Step 3
Use these figures to decide which plugging material is appropriate and how much you will need. A licensed water well contractor can help you decide. Whether or not the casing can be successfully pulled out will also determine which material to use and what method is appropriate for placing it into the well. If the casing cannot be removed, choose a slurry that can be pumped under pressure into the well so that any space around the outside of the casing will also get filled in.
Step 4
Disinfect the well. Add enough chlorine to bring the water standing in the well to a chlorine concentration of 200 mg/L. For every 450 L (100 gal.) of water in the well, add 2 L (0.4 gal.) of household bleach (5.25% chlorine). See Module 6 "Shock Chlorination—Well Maintenance" to calculate how much water is in your well. Leave this chlorine in your well.
Step 5
If possible, remove the well casing.
Step 6
Place the plugging material into the well. It must be introduced at the bottom of the well and placed progressively upwards to ground surface. The only exception to this rule is when the plugging material being used is a bentonite pellet that has been designed and manufactured for pouring into the well from the ground surface.
Step 7
If the casing was not already removed, dig around it and cut it off a minimum of 0.5 m (20 in.) below the ground surface (see Figure 4, Cutting Off the Casing and Mounding the Clay).
Step 8
Backfill and mound this portion of the hole with material appropriate for intended use of the land (i.e., clay) (see Figure 4, Cutting Off the Casing and Mounding the Clay).
Step 9
Use the worksheet at the end of this module to record the details of your well plugging. Include the well owner name, legal land description, GPS location, total depth, casing diameter, type and amount of plugging material used, date and method of placing material into the well. Send a copy of this record to:
Alberta Environment and Sustainable Resource Development
Groundwater Information Centre
11th Floor, Oxbridge Place, 9820-106 Street
Edmonton, Alberta T5K 2J6
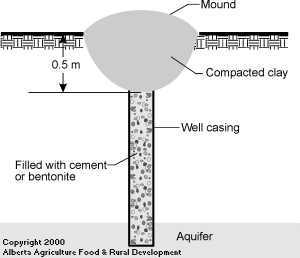
Figure 4 Cutting Off the Casing and Mounding the Clay
By regulation, a well must be filled full length with impervious material. That material must be introduced into the well
at the bottom and be placed progressively upward to ground surface. |
Special Problems
Flowing wells present special problems for plugging. It is highly recommended that you use the services of a licensed water well contractor. Before a flowing well can be plugged, the flow must be controlled. Several methods can be used:
- Reduce the flow by pumping high specific gravity fluids such as drilling mud or cement into the well.
- If there is a nearby well that is tapped into the same aquifer as the flowing well being plugged, pump it to create a drawdown in the well being plugged.
- Where practical, extend the well casing high enough above the ground surface to stop the flow.
|
|