|
Introduction | Area of interest | Labelling | Printing | Selecting soil polygons | Build results file | Extract other LSRS ratings
Introduction
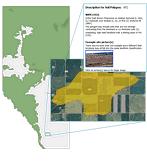
What follows is a detailed outline for learning as much as possible about the Land Suitability Rating System (LSRS) rating for Spring Seeded small grains as well as for brome grass, alfalfa, and canola. The setting of this how to is that someone has asked for a map graphic and screen captures of the detail soils description of the soil polygons within or touching the boundaries of an area of interest. For the purposes of this document the area of interest will be for a township near Balzac Alberta.
1. "Right Click and Open in New Tab" the Online Soil Viewer uniform reference locator (URL) or click on the graphic:
2. Left mouse click or tap the  button to get started working in the Alberta Soil Information Viewer environment. button to get started working in the Alberta Soil Information Viewer environment.
3. Left mouse click or tap the maximize viewer button  in the top right corner of banner for the viewer. in the top right corner of banner for the viewer.
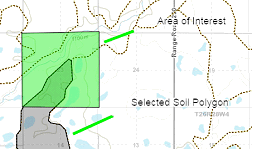
Area of Interest
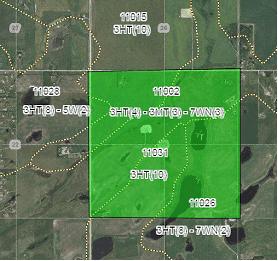
1. For the purposes of this “How To” they area of interest is Section 23 Township 26 Range 29 West of 4 east of “Balzac”, the geographic coordinates area 51.22782, -113.94742.
a. Enter “Balzac” in the search box of the viewer and left click, tap the magnifying glass icon to begin the search. Tapping the “done” button , or pressing enter key if available. will also initiate the search.
b. Holding the left mouse button or making contact with the screen drag and move the map area so that area of interest is centered in the map area. Each Township in the mapped area will have a label  and each Section has a label as well that is in the center of the section of interest. Quarter sections NW, NE, SW, and SE are inferred by the quarter section line work that is layered on top of each section polygon. and each Section has a label as well that is in the center of the section of interest. Quarter sections NW, NE, SW, and SE are inferred by the quarter section line work that is layered on top of each section polygon.
2. If a Legal land description, or latitude longitude coordinate, or AGRASID polygon number is available enter these into the search box and repeat step 1b.
3. Zooming may be accomplished by any or a combination of methods :
a. Left mouse clicking or tapping the plus and minus icon in the top right corner of the map area for the viewer.
b. Pinch or spread (pinch out) hand gestures.
c. Utilizing roller wheel if available on a mouse.
4. Change the base map choice to:

a. SPOT6 2015 – 150cm
 or or
b. Imagery with lables.

For the purposes of this “How To” choose the “Image with Labels” option.
5. Close the basemap tool 
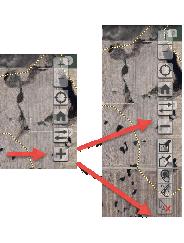
Labelling
There are two approaches that may be of use in Labelling a map with the polygon id number and the LSRS rating.
The automated approach labels the soil polygons in the map display by:
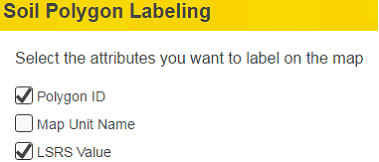
1. Pressing the Soil Polygon Labelling functioning mode button:

2. Check marking Polygon ID and LSRS Value (for spring seeded small grains)
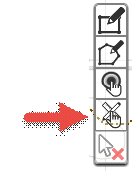
The manual approach may be preferable in cases soil polygon labeling is taking a long time to display or the label’s insertion point inside the soil polygon is not currently on screen because only a portion of the polygon is displayed . In this case:
1. Choose the General land functional Mode for left, side window.
2. With the cursor choose a soil polygon associated with the area of interest.
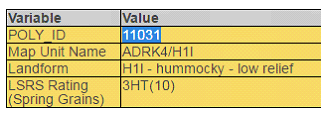
3. Highlight and copy the POLY_ID Value
4. Open the Markup tool:

5. Paste the POLY_ID Value in the “Place Label” text boxOpen the Markup tool:
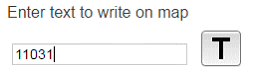
6. Left mouse click or tap the “activate text drawing” tool  and then “Place the Label” , if possible inside the displayed and selected soil polygon. and then “Place the Label” , if possible inside the displayed and selected soil polygon.
7. Press the save button in the “edit, load and save tools” 
8. Repeat the previous steps 3. through 7. for the LSRS Ratomg (Spring Grains) value in the General Information.  window. window.
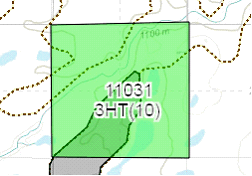
9. Repeat the previous steps 1. through 8. until all soil polygons associated with the area of interest have all been appropriately labeled:
Go to the Welcome Page | Go to the top of this page
Printing
1. Activate the Print tool 
2. Go to the “Screenshot Options” in the Print  window. window.
3. Left mouse click or tap the screen shot icon. 
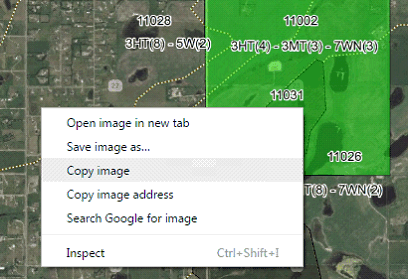
4. Right mouse click or tap and then copy the resulting jpg, png, or pdf image into a work document.
5. Paste the image into a word document and adjust the size of the image:
Go to the Welcome Page | Go to the top of this page
Selecting Soil Polygons
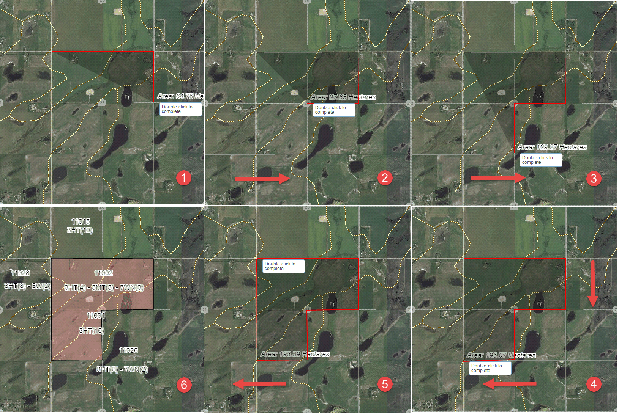
Up until this point in the “how to” area of interested was assumed to be pre-existing. This section will show how to create an area of interest for three of the four quarters associated with 23-026-29-4 (i.e. NW-23-026-29-4, NE-23-026-29-4 and NE-23-026-29-4).
1. Activate the polygon drawing tool and draw the area of interest in the map area of the viewer.

2. Begin constructing a multi-segmented polygon markup by left mouse click or tapping a series of vertex points in a clock-wise or counter clock-wise path outlining the shape of the three quarter sections of interest in this “How To”:
3. Show the select (soil polygons) tool bar in the top right corner of the screen:
4. Choose the “select using markup layer”
5. Left mouse click or tap to choose the “area if interest” markup built earlier as the markup to select soil polygons:
Go to the Welcome Page | Go to the top of this page
Build Results File
1. Choose the “Gerneral Land Information”  functioning mode for the side window.1. functioning mode for the side window.1.
2. In the “Select polygons on the map” area of the  side window: side window:
a. For each POLY_ID value, left mouse click or tap the value in the list.
b. Then left mouse click the “Export to PDF” button at the bottom of the at the bottom of the  window to export the following items for each POLY_ID value to an adobe reader file: window to export the following items for each POLY_ID value to an adobe reader file:
i. A Table,
ii. Landscape Model Description,
iii. Image (if available),
iv. Landform Model (if available), and
v. Landform Profile (if available).
3. Move all the adobe reader (PDF) files from the default browser download location to a more accessible file folder.
4. Using Adobe Acrobat merge the PDF file together or
5. Use screen capture software to cut and paste the content from all PDF export files into a word processing document.
6. Exit the  functioning mode of the side window. functioning mode of the side window.

Go to the Welcome Page | Go to the top of this page
Extract Other LSRS Ratings
Extract Other LSRS ratings for brome grass, alfalfa, and canola production by:
1. Choosing the “Query AGRASID”  functioning mode. functioning mode.
2. Then in the “Construct query and press Search” area of the Query AGRASID side window:
a.Choose the “Soil Landscape Polygons” table as the: 
b. Sub-select the related records of the LSRS Rating (Spring Grains) table: 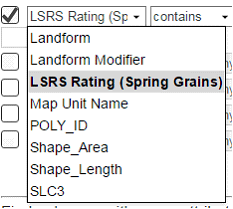
c. and press the search  button. button.
d. Export all the records to a csv file 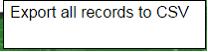 from the “Query Results” from the “Query Results”  window by left mouse clicking or tapping the window by left mouse clicking or tapping the  button. Further clean up of the CSV file may be conducted in Microsoft Excel spreadsheet environment. button. Further clean up of the CSV file may be conducted in Microsoft Excel spreadsheet environment.
e. The resulting Map graphic, merged PDF or micorsoft Word document and acconpanying Microsoft Excel compatible CSV text file represent all that may be known about LSRS for selected AGRASID soil polygons.
3. For a detailed descriptions of how to do other tasks such as: “Run the Viewer” return to the Alberta Soil Information Viewer Welcome Page and browse the “Read How to:” or “Watch How to: ” sections of the welcome page.
Go to the Welcome Page | Go to the top of this page

Contact the Ag-Info Centre, toll-free in Alberta at 310-FARM (3276), for further soil viewer and agricultural information.
12132016 |