| | Soil Sampling and Testing | Sampling and Testing Manure | Record Keeping | Farm Management Planning
Soil testing and record keeping are fundamental to managing your operation in an agronomically, economically and environmentally sound way. Alberta's Agricultural Operation Practices Act sets the minimum standards for soil testing and record keeping for producers who apply more than 500 tonnes of manure (wet weight) annually. However, all producers can benefit from regular soil testing and good record keeping.
Soil Sampling and Testing
Soil testing provides an inventory of plant-available nutrients and other soil chemical factors important for crop production. This information gives a basis for recommending applications of additional nutrients. Tailoring fertilizer applications to the crop's needs is the key to avoiding overapplication and reducing impacts on water, soil and air quality. It also helps save money and conserve energy.
Sampling
The key to any soil testing program is taking samples which accurately represent the field's nutrient levels. A fertilizer recommendation based on a sample that is not representative will not be correct.
For representative samples, you need to take into account the variability in soil nutrient levels that often occurs within fields, even on fields that seem uniform (see following section on "Soil Sampling Strategies"). Nutrient levels can be influenced by many factors such as topography and soil type. For example, nutrient levels can change along a slope, especially if erosion carries nutrient-rich topsoil from the hilltop to the low area. Saline spots, poorly drained depressions, and eroded knolls should not be sampled unless they represent a significant portion of the field. If they do represent a significant part of the field, they should be sampled separately.
Collect samples from 20 to 30 locations per field. At each location, take samples at depth intervals of: 0 to15 cm (0 to 6 in), 15 to 30 cm (6 to 12 in), and 30 to 60 cm (12 to 24 in). Including the three depths allows monitoring of leachable nutrients. Record the sampling locations and the soil conditions at sampling (temperature, moisture, crop cover).
Mix the samples from the same depth intervals, creating one large sample for each of the three depth intervals. Remove about 0.5 kg (1 lb) from each large sample. Submit each of the 0.5 kg sub-samples to a commercial lab for analysis.
Soil sampling strategies
Whole field composite sampling - Take 20 to 30 cores from representative locations throughout the field (Figure 3.1). Mix the cores together, and submit about a 0.5 kg (1 lb) sub-sample for each of the three depth intervals.
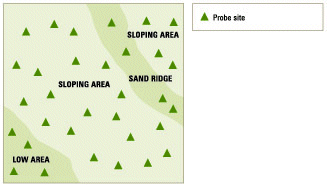
Figure 3.1. Whole field composite sampling
Landscape-directed sampling - Divide the field into several areas based on such factors as soil characteristics, management history, yield potential or slope position. Take a set of samples from each of the areas (Figure 3.2). Additional resources are used to develop the sampling design such as: land use history, yield maps and yield history, air photographs, and soil survey information.
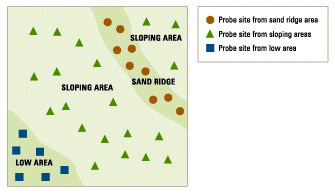
Figure 3.2. Landscape-directed soil sampling
Benchmark sampling - Divide the field into several areas based on such factors as soil characteristics, management history or yield potential. Take 15 to 20 samples from each area in a location that is representative of that area of the field (Figure 3.3). Sample at the same locations each year. For each area of the field, mix the samples from the same depth interval.
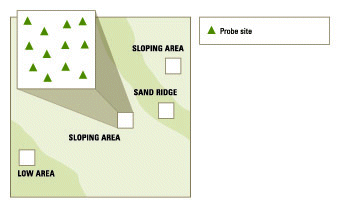
Figure 3.3. Benchmark soil sampling
Grid sampling - Sample soils at regular intervals throughout the field (e.g. every 100 m) (Figure 3.4). Do not mix the cores together. For most producers, the large number of samples required in this approach is not justified in terms of the economic returns.
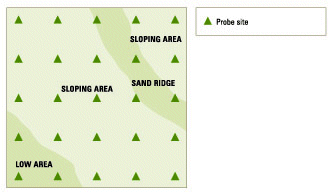
Figure 3.4. Grid soil sampling
Figures 3.1, 3.2, 3.3 and 3.4 adapted from: McNeil et al. 2002. Nutrient Management Planning for Livestock Production: Class Participant Package. Alberta Agriculture, Food and Rural Development, Alberta Cattle Commission, Alberta Environmentally Sustainable Agriculture Program, and Canada-Alberta Farm Business Management Program.
Testing
Soil test reports provide soil nutrient results and recommend fertilizer rates. The lab will test for the nutrients you specify. You can also ask for tests to assess specific soil concerns, such as levels of salt or heavy metals.
The lab's fertilizer recommendations are based on the soil nutrient levels as well as such factors as the location of the field, previous crop, intended crop, expected yield, and soil moisture content. For more information on nutrient application rates, see Nutrient Management.
Sampling and Testing Manure
The nutrient content of manure can vary greatly depending on the type of animal and how the animal is managed as well as on manure handling and storage practices. Manure sampling and testing is used to determine the manure's actual nutrient content, determine the appropriate application rate, and identify what other nutrients may be required by the crop.
Sampling
The best time for sampling is during loading or land application. Submit the sample for analysis as soon as possible after sampling. Generally, a sample of about 5 lb (2.25 kg) from the possibly hundreds of tons of manure is sent for analysis. (See box for sampling procedures.)
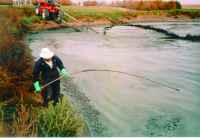
Manure sampling and testing is used to determine the manure's actual nutrient content.
Courtesy of PAMI
Sampling liquid manure
| 1. | Take samples each time the storage is emptied because the nutrient status varies with the time of year. |
| 2. | Agitate the storage completely before sampling. |
| 3. | Collect the sample from various depths as the storage is being emptied because the
nutrient status varies with depth. Thoroughly mix 10 to 20 samples from each depth and transfer a portion to a plastic jar. The jar should be only half full to avoid gas buildup and potential explosion. |
| 4. | Seal the container tightly, and store it in a cool place. |
| 5. | Label the sample, including name, date and storage identification. |
| 6. | Submit the sample to the lab within 24 hours. |
Sampling solid manure
| 1. | Sample manure each time the storage is emptied until a trend is evident in the results. Then sample every few years or when a change in management occurs (e.g. bedding, storage). |
| 2. | Remove the crust to sample the pile. |
| 3. | Take a sample (using a pitchfork, for example) from various parts of the pile. Try to take into account visible variations in bedding and moisture content. |
| 4. | Place the samples on a clean cement pad or plywood. Chop the samples with a shovel or fork, and mix the samples as thoroughly as possible. Divide the manure into four portions and discard three. |
| 5. | Continue dividing and mixing the manure until you can fill a half-litre shipping container. |
| 6. | Store the sample in a tightly sealed container in a cool place. |
| 7. | Label samples, including name, date and storage identification. |
| 8. | Submit the sample to the lab within 24 hours |
Adapted from: McNeil et al. 2002. Nutrient Management Planning for Livestock Production: Class Participant
Package. Alberta Agriculture and Rural Development, Alberta Cattle Commission, Alberta Environmentally Sustainable Agriculture Program, and Canada-Alberta Farm Business Management Program.
Testing
Samples should be tested for moisture content (solid manure), total nitrogen, ammonium nitrogen, and total phosphorus. If the soil has other nutrient deficiencies, you can test the manure to see how much of those nutrients it can supply. You can also request additional analyses such as: electrical conductivity (to determine salt content), sodium adsorption ratio, carbon:nitrogen ratio, pH and sodium.
Manure nutrient results should be on a wet (or "as is") basis because manure is spread wet. Manure test results should be in the same units as used when calibrating the manure application equipment (pounds or kilograms). Take special care when converting units. For information on determining manure application rates, see Nutrient Management. You can also contact a qualified professional agrologist for more information and advice.
- For more information, see Nutrient Management Planning for Livestock Production (ARD).
Record Keeping
Maintaining detailed records for your farm helps you assess your current techniques and refine them for better agronomic, economic and environmental performance.
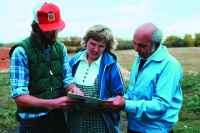
Use your records to make management decisions.
Courtesy of ARD
Keep records by field and by year. Include all the practices used, the types, rates and dates of application of all inputs used, maps of soil sampling locations, results from soil and manure tests, the crop type and yield, details of any crop disease, weed and/or insect problems, and weather conditions. Keep your records up to date, and retain them for at least five years. Use your records to make management decisions.
- See ARD's website for lists of software available for field record keeping
Farm Management Planning
Farm management planning helps farm families to consider and discuss their long-term goals for the family and the farming operation, and to determine the steps needed to reach those goals. It also enables farm families to put environmental considerations in the context of the whole operation.
Along with an overall management plan for the farm, many producers choose to develop plans focusing on specific elements of their operation. For example, an environmental farm plan helps producers to assess their environmental risks and develop a plan to address those risks, and a nutrient management plan helps producers determine the best way to manage nutrients.
Back to Chapter 3 - Cropping Practices |
|